So last Thursday — and I remember it was Thursday because my kid had soccer practice and I was killing time — I grabbed a container of heavy cream from the fridge to make whipped cream for strawberries. Normal parent stuff. But then I spotted the jar of instant espresso on the counter. And my brain did that thing where it connects two dots that have no business being connected.
What if I just… put espresso in the whipped cream?
Twenty minutes later I was standing at the counter with a spoon, eyes closed, having what I can only describe as a religious experience. My wife walked in, saw my face, and said “what happened.” Not a question. A statement. Like she was worried. I shoved a spoonful at her before she could even set down her keys. She ate it, paused, and went “okay yeah that’s insane.”
Four ingredients. That’s what this takes. Heavy cream, instant espresso powder, sugar, vanilla. No eggs, no gelatin, no double boiler. Nothing that requires a culinary degree or even moderate intelligence, apparently, since I stumbled into it by accident on a random weeknight. The whole thing comes together in maybe ten minutes if you’re moving slow, and it tastes like something a French restaurant would charge you twenty-two dollars for. (They’d put it in a tiny glass and call it “mousse au cafe” and you’d feel very sophisticated eating it. You can have that same experience in your kitchen wearing sweatpants. I certainly did.)
The lineup: one cup of heavy cream, two tablespoons of instant espresso powder, three tablespoons of sugar, and one teaspoon of vanilla extract. I keep waiting for someone to tell me I’m forgetting something. Nope. Four ingredients, and it genuinely rivals desserts with ingredient lists the length of my arm.
This article includes affiliate links. We may earn a commission at no extra cost to you.
What You’ll Need
- 1 cup heavy whipping cream (cold — straight from the fridge, this is critical for whipping)
- 2 tablespoons instant espresso powder (not regular instant coffee — espresso powder is more concentrated)
- 3 tablespoons granulated sugar
- 1 teaspoon pure vanilla extract
- 1 tablespoon hot water (for dissolving the espresso)
- A large mixing bowl (metal or glass, chilled in the freezer for 10 minutes helps)
- Electric hand mixer or stand mixer with whisk attachment
- Serving glasses — wine glasses, small jars, or ramekins
A Few Tools That Help
- An electric hand mixer. Whipping cream to stiff peaks by hand is a ten-minute arm workout. A KitchenAid 5-speed hand mixer gets you there in about ninety seconds.
- Instant espresso. The recipe is built on it for a reason — Medaglia D’Oro instant espresso dissolves without watering down the cream.
- Real vanilla. A splash of McCormick pure vanilla extract rounds out the coffee and keeps it from tasting flat.
Why Instant Coffee Works Better Than Brewed
I know. I KNOW. Instant coffee? In a dessert recipe? On a coffee website, no less? Hear me out — because I fought this too, and I was wrong.
Here’s the thing — when you add brewed coffee or espresso to whipped cream, you’re basically adding water. And water is the absolute enemy of whipped cream. It murders the air bubbles you just spent minutes creating and thins everything into a soupy mess. I watched this happen in real time once. Poured in maybe two tablespoons of beautiful, freshly pulled espresso, and my gorgeous stiff peaks just… collapsed. Like a sad deflating balloon. I stood there holding my whisk feeling like a complete idiot.
Instant espresso powder dissolved in just one tablespoon of hot water? Completely different story. You get the same — honestly, MORE — intensity of coffee flavor with barely any liquid. The concentrate comes out thick, almost syrupy, and it slides into the cream without wrecking anything. I tested both side by side (because of course I did) and the instant version held its peaks for hours longer AND had more intense coffee flavor. Sometimes the humble instant coffee really is the right tool for the job. Annoying but true.
Step-by-Step: 10-Minute Coffee Mousse
Step 1: Dissolve the Espresso (1 minute)
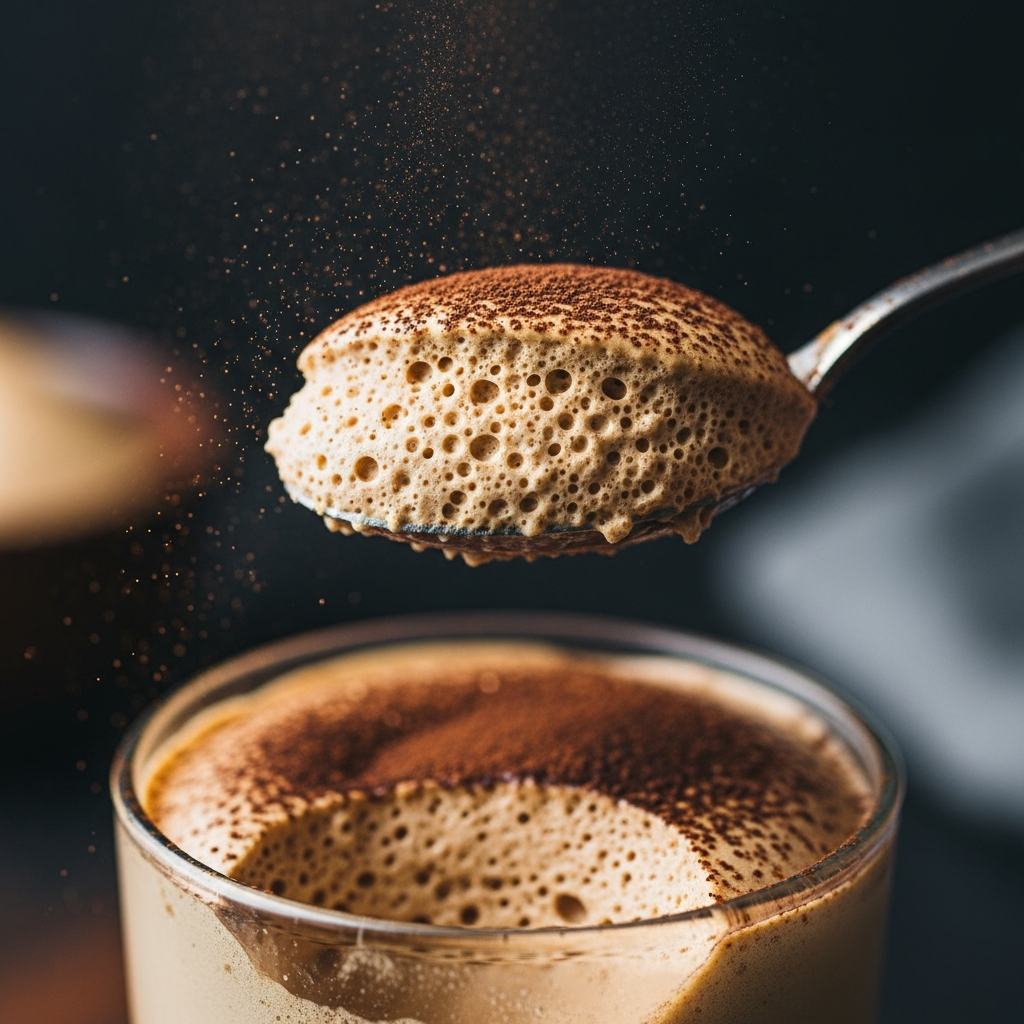
Dump 2 tablespoons of instant espresso powder into a small cup. Add 1 tablespoon of hot water — not boiling, just hot tap water is fine. Stir until it’s dissolved into a dark, syrupy paste. Smells incredible, by the way. Set it aside to cool while you get everything else ready. This paste needs to be room temperature or cooler before it goes anywhere near the cream — hot liquid plus cold cream equals whipping disaster. I learned that one the messy way.
Step 2: Start Whipping the Cream (3 minutes)
Pour 1 cup of cold heavy cream into your chilled bowl. Fire up the hand mixer on medium speed. Now here’s where I want to be really specific because the whipping stages tripped me up my first few times.
For the first minute or so, basically nothing exciting happens. Just cream sloshing around getting frothy. Patience. Around the 90-second mark you’ll see it start to thicken — actual body forming, not just bubbles. By 2-3 minutes, you’re at soft peaks. That’s when you lift the beaters and the cream makes a little peak that gently curls over on itself, like a wave that thought about breaking but changed its mind. It should NOT stand at attention yet. If it does, you went too far — back up. (Kidding, you can’t back up. But you’ll be fine for the next step.)
Step 3: Add Sugar and Vanilla (2 minutes)
Once you hit soft peaks, toss in the 3 tablespoons of sugar and 1 teaspoon of vanilla. Bump the speed to medium-high. Now pay attention — and I mean really pay attention — because things move FAST from here. You’re going from soft peaks to medium to stiff, and the gap between “perfect stiff peaks” and “congratulations, you just made butter” is about 30 seconds. Maybe less. I’ve blown past it twice.
Stiff peaks stand straight up like little mountains when you pull the beaters out. The cream should look glossy and smooth, not grainy or lumpy. The SECOND you see that? Stop. Put the mixer down. Walk away if you have to. Every extra second past this point is a gamble you don’t want to take.
Step 4: Fold in the Espresso (2 minutes)
This part trips people up more than anything. Whatever you do, do NOT turn the mixer back on. Seriously. Put it down. I feel like a broken record but this is the single biggest mistake people make with mousse.
Drizzle the cooled espresso concentrate over the whipped cream. Grab your biggest spatula or a big spoon. Now you’re going to fold — which just means cut down through the center of the cream, sweep along the bottom of the bowl, and bring it up and over the top. Turn the bowl a quarter turn. Do it again. Maybe 15 to 20 times and the espresso will be pretty well distributed. Got some marbling still showing? Leave it. It actually looks gorgeous in a glass. Chasing perfection here just knocks out air, and air is literally the entire point of mousse.
You’ll lose a tiny bit of volume during this step. Totally normal — maybe 10% deflation. What you’re left with is this impossibly light, intensely coffee-flavored cream that holds its shape but basically dissolves the second it hits your tongue. It smells like walking into a Parisian coffee shop. Not that I’ve been to Paris. But I’m pretty sure this is what it smells like.
Step 5: Portion and Chill (2 minutes active, 30 minutes passive)
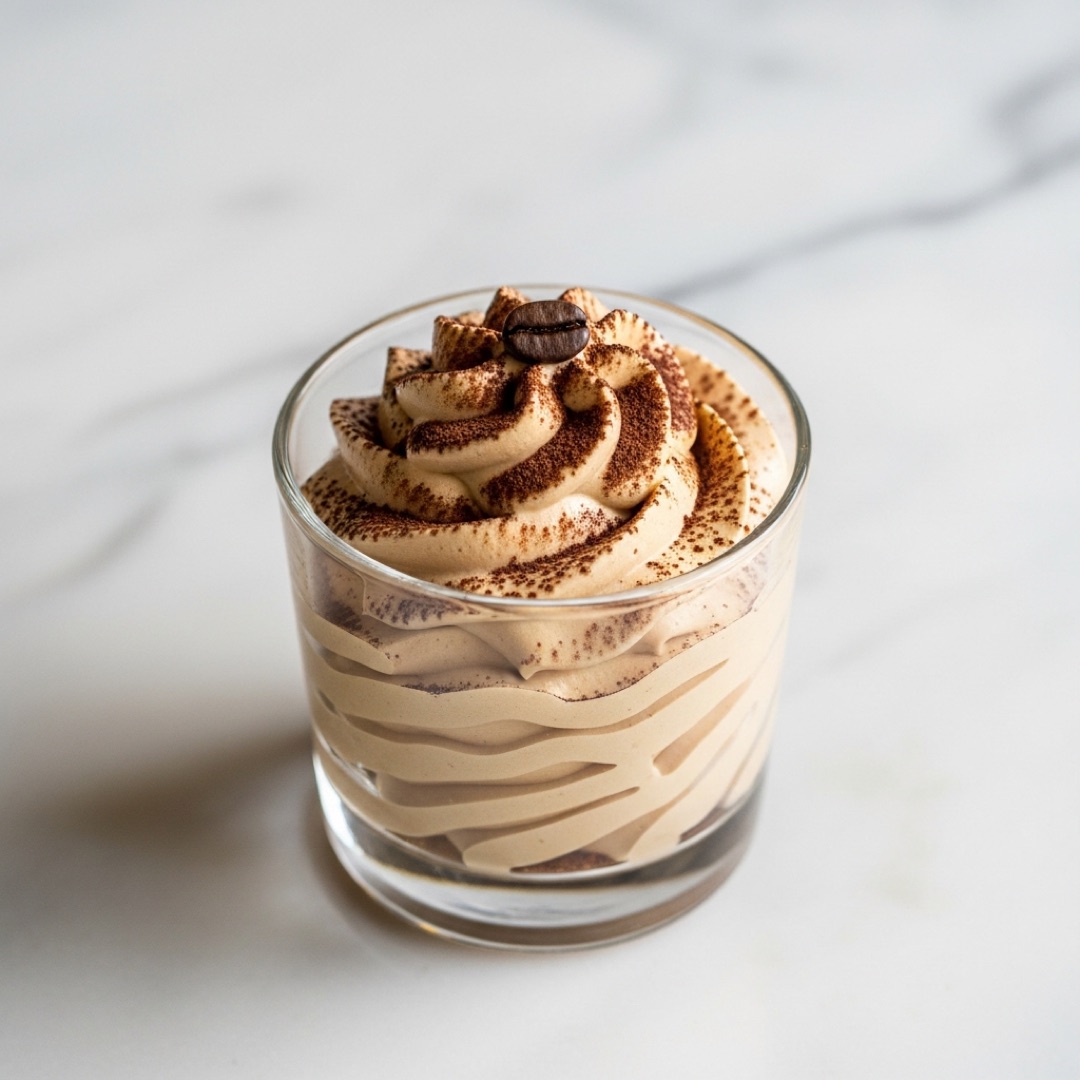
Spoon or pipe the mousse into serving glasses. Wine glasses are my go-to — the tall narrow shape shows off the mousse beautifully, and honestly? Eating dessert from a wine glass just makes a Tuesday feel like a celebration. Fill each about three-quarters full. You’ll get 3-4 servings depending on glass size.
Cover with plastic wrap, stick them in the fridge, at least 30 minutes. The chilling firms things up a bit and — this is the part I didn’t believe until I tested it — the coffee flavor actually develops and deepens. It’s good right away, honestly. But after that half-hour rest? Noticeably better.
Worth the wait.
Understanding the Whipping Stages
Look, getting the whipping right is literally the only skill required here. So let me break it down in probably more detail than any reasonable person needs — because this is where things tend to go sideways, and I’d rather over-explain than have you end up with butter.
Liquid cream (0-1 minute): Just cream sloshing around. Some sad little bubbles on the surface. Nothing exciting. You’ll wonder if it’s working. It is.
Frothy (1-2 minutes): Doubled in volume, looks foamy like a kid’s bubble bath. Encouraging! But tilt the bowl and it flows right out. Still basically liquid wearing a foam costume.
Soft peaks (2-3 minutes): First real milestone. Lift the beaters and you get a peak that immediately droops over like it can’t be bothered to stand up straight. Thick enough to coat a spoon. THIS is when you add sugar and vanilla. Don’t skip ahead.
Medium peaks (3-4 minutes): Peaks hold for a second or two before slowly tipping over. Think thick, billowy clouds. Close but not quite there for mousse — keep going, but keep watching.
Stiff peaks (4-5 minutes): Peaks stand straight up and stay there. Glossy, smooth, firm. THIS is your target. Stop here. Every. Single. Second. Past this point is danger zone territory.
Over-whipped (oh no): Grainy looking. You’ll see tiny lumps of butterfat forming in thin, watery liquid. Basically you’re making butter now. If you catch it SUPER early, you can sometimes rescue it by gently folding in a tablespoon of fresh cold cream. But once it’s truly gone? It’s gone. Fresh cream, new bowl, start over. (This is exactly why I now stop my mixer one stage before I think it’s ready and finish the last bit by hand with a whisk. Total control. Zero regrets. Highly recommend this approach if you’re anxious about it like I was.)
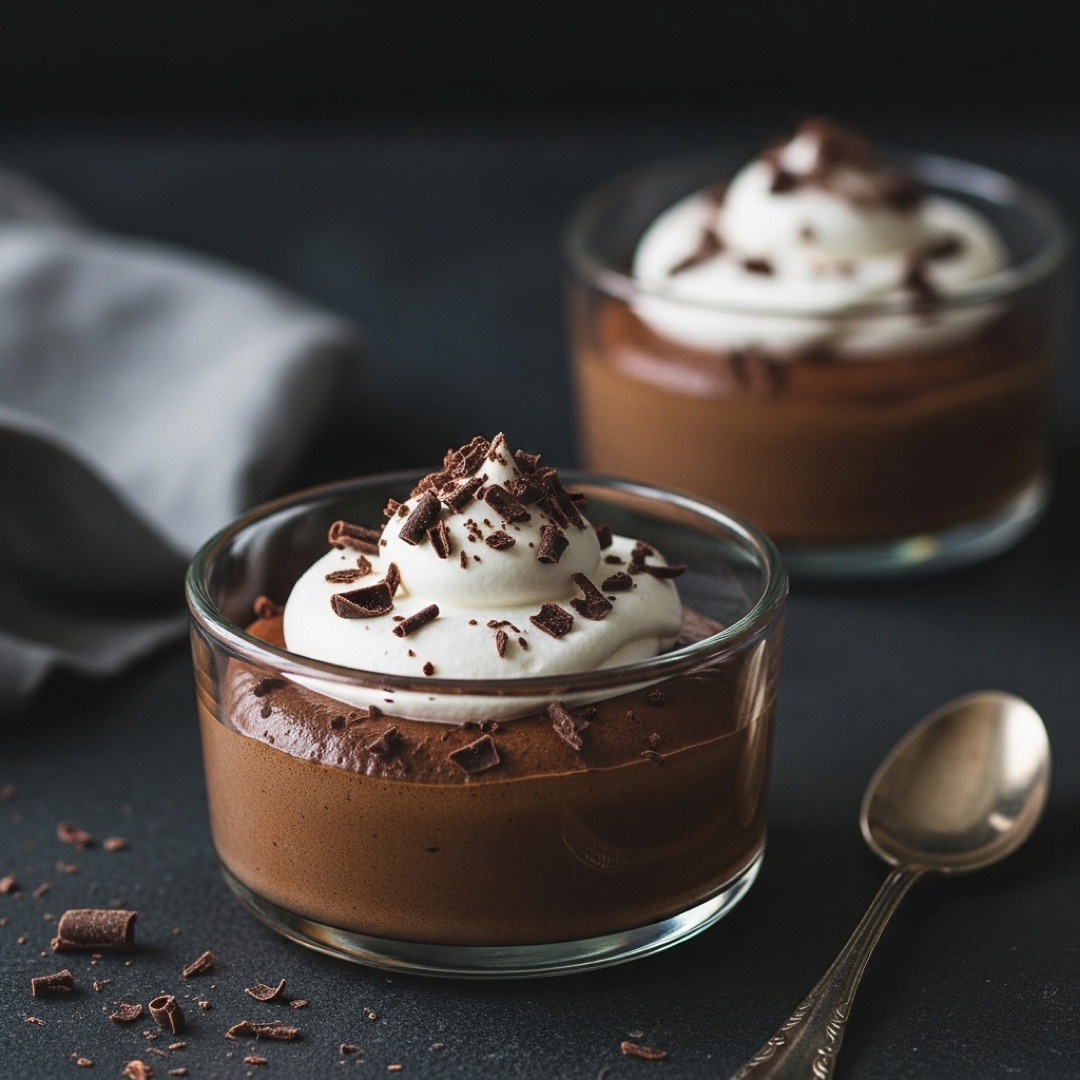
Chocolate-Coffee Mousse Variation
Oh man. Okay. For a mocha version that’s equally stupid-easy, add 2 tablespoons of unsweetened cocoa powder to the sugar before it goes in the cream. SIFT the cocoa first — it clumps like nobody’s business and those lumps will haunt your mousse forever. I didn’t sift it once and spent ten minutes trying to fold out chocolate chunks. Not fun.
The cocoa darkens everything to this gorgeous deep brown and adds a chocolate note that plays off the espresso like — honestly like they were always meant to be together. I’ve served both versions side by side at dinner parties and the mocha one disappears first. Every time. Without fail. Pairs especially well with those bold flavors you find in a good dark roast.
Serving and Presentation Tips
Coffee mousse in a wine glass, dusted with cocoa powder, single coffee bean perched on top. That’s your Pinterest moment right there. But here are some other moves I’ve pulled off — some impressive, some honestly just lazy creativity:
- Layered in a glass: Alternate spoonfuls of coffee mousse and chocolate mousse for a striped effect. Use a clear glass so you can actually see the layers. Looks WAY harder than it is.
- With cookies: Stick a thin cookie — biscotti, one of those Pirouette wafer things, shortbread — into the mousse at an angle. Edible decoration plus crunch. Guests lose it over this one.
- Espresso drizzle: Dissolve 1 teaspoon instant espresso in 2 teaspoons hot water, drizzle over the top right before serving. Dark lines against the lighter mousse. Pretty striking for about 30 seconds of effort.
- Whipped cream cap: Pipe a small rosette of plain whipped cream on top. White against tan. Classic for a reason — it just works.
- Chocolate shavings: Run a vegetable peeler along a dark chocolate bar and let the curls tumble over the top. Takes five seconds, looks like you tried really hard. My favorite kind of shortcut.
Storage and Make-Ahead Notes
Keeps in the fridge for up to 2 days, covered tightly with plastic wrap. After that it starts deflating and weeping — the air slowly escapes and you’re left with something that’s more like coffee-flavored cream than actual mousse. Kind of sad. For a dinner party, I make it the morning of and serve that evening. That window — roughly 4-8 hours — is the sweet spot where flavor, texture, and volume are all at their peak.
Don’t freeze it. Just don’t. I tried. The whipped cream structure collapses completely and does NOT come back. When you’re making coffee-based desserts at home, anything whipped cream-based needs to stay fresh. That’s just how it goes.
Scaling Up for a Crowd
Doubles and triples perfectly — no weird ratio adjustments needed. For 8-10 servings: 2 cups heavy cream, 4 tablespoons instant espresso, 6 tablespoons sugar, 2 teaspoons vanilla, 2 tablespoons hot water. Everything scales linearly. Just use a big enough bowl — whipped cream expands a LOT and you don’t want it climbing over the sides. Ask me how I know.
I once did a quadruple batch in my stand mixer for a holiday thing — Thanksgiving, I think? — and portioned it into sixteen little glasses. Maybe twenty minutes start to finish. People thought I’d been laboring over some elaborate French dessert all afternoon. I let them think that.
(I’m telling you now though. Twenty minutes. Sixteen servings. You’re welcome.)
Troubleshooting Common Issues
The mousse is runny: Two usual suspects — either you didn’t whip to true stiff peaks, or your espresso concentrate was still warm when you folded it in. Both will wreck the structure. Make sure peaks are stiff-stiff (like, standing at full attention) and the espresso paste is cool to the touch before it goes anywhere near the cream.
The mousse tastes bland: More espresso powder next time. You can push it up to 3 tablespoons without adding extra water. Here’s a tip that took me a few batches to figure out — it should taste almost TOO strong in the bowl, because the cream and sugar mellow it out significantly once it chills. What tastes intense now will taste perfectly balanced an hour from now.
The mousse is grainy: Undissolved espresso powder. That’s the culprit every time. Stir the powder in the hot water until every last granule is gone before it goes anywhere near the cream. If you’re doing the chocolate version, sift your cocoa. Those clumps are persistent little troublemakers and they will not fold out no matter how hard you try.
It deflated overnight: All whipped cream desserts lose volume over time — it’s just physics working against you. Making it same-day gives the best results by far. If it deflated a LOT, you probably over-folded when adding the espresso and knocked too much air out. Fewer folds next time. Remember — some marbling is totally fine and actually looks nice.
Frequently Asked Questions
Can I use a hand whisk instead of an electric mixer?
Yep, but your arm will hate you. Takes 8-10 minutes of hard whisking instead of 4-5 with electric. Upside? Basically impossible to accidentally make butter because you control the speed. Decent arm workout too.
Can I use regular instant coffee instead of instant espresso?
Short answer: yes, use 3 tablespoons instead of 2. Regular instant isn’t as punchy as espresso powder. Flavor leans more “diner coffee” than “fancy espresso bar” but still good. Same 1 tablespoon of hot water to dissolve.
Is this mousse safe without eggs?
Totally. Traditional French mousse uses raw eggs, which makes some people nervous. This skips them entirely — all the airiness is from the whipped cream. Lighter than the egg version, way faster to make, zero food safety drama. I’ll take that trade every time.
How far ahead can I make this?
Honestly? 2-8 hours is the sweet spot. Make it morning, serve it after dinner. Past 24 hours it deflates and you get liquid pooling at the bottom. Still edible at 48 hours technically, but it won’t look like mousse anymore. For the best coffee flavor and freshness, same-day is always the move.