I used to spend $6 every morning on an iced latte that was basically caffeinated sugar water. Then I started making coffee smoothie bowls, and within a week, the latte habit was dead. This bowl gives me caffeine, 30+ grams of protein, and enough substance to keep me full until lunch — all for under $2 and five minutes of work.
The secret ingredient that makes this recipe work isn’t some exotic superfood. It’s frozen coffee cubes. That’s it. By freezing brewed coffee into ice cube trays, you get an intensely coffee-flavored base that blends thick like frozen fruit — no watering down, no weak coffee flavor, just dense cold-brew-level intensity in a spoonable bowl. I’ll walk you through the whole process below, plus five topping variations so you never get bored.
If you prefer drinking your coffee smoothie rather than eating it with a spoon, check out my coffee smoothie without banana recipe for a thinner, drinkable version.
How to Make Frozen Coffee Cubes (The Key to This Recipe)
This step takes 5 minutes of active time but requires overnight freezing, so do it the day before your first bowl. Once you have a stash of coffee cubes in your freezer, making the smoothie bowl itself takes under 5 minutes.
What You Need
- Strong brewed coffee (use double the normal amount of grounds, or brew espresso and dilute slightly)
- A standard silicone ice cube tray (silicone is better than plastic — the cubes pop out easier when frozen solid)
Instructions
- Brew strong coffee. I use about 35g of ground coffee per 400ml of water. You want it notably stronger than what you’d drink — the flavor dilutes when blended with other ingredients. A standard 12-cup coffee maker works fine; just use more grounds than usual.
- Let the coffee cool to room temperature. Don’t pour hot coffee into a plastic ice cube tray — it can warp the tray and also takes forever to freeze. 20-30 minutes on the counter is enough.
- Pour into the ice cube tray. Fill each compartment about 90% full. A standard tray makes 12-16 cubes, which is enough for 2-3 smoothie bowls.
- Freeze for at least 6 hours, preferably overnight. You need them frozen completely solid — if the center is still slushy, your bowl will be too thin. I freeze mine overnight and they’re perfect by morning.
- Pop them out and store. Once frozen, transfer the cubes to a freezer bag or container. They’ll keep for up to 3 months without losing flavor, though I’ve never had them last more than a week in my house.
Batch tip: I make a double batch every Sunday. Two full ice cube trays gives me about 28-30 cubes, which is enough coffee smoothie bowls for the entire week. It takes 10 minutes and then I don’t think about it until the following Sunday.
Base Coffee Smoothie Bowl Recipe
This is the foundation that all five variations build on. Master this base, and you can customize it endlessly.
Ingredients
- 8-10 frozen coffee cubes (from the method above)
- 1 medium frozen banana, sliced (freeze ripe bananas the night before — peel first, or you’ll regret it)
- 1 scoop (30g) vanilla or chocolate protein powder (whey or plant-based both work)
- 80-120ml milk of choice (start with 80ml — you can always add more, but you can’t take it out)
Equipment
- High-speed blender (a regular blender struggles with frozen cubes — you need something with at least 700 watts)
- A wide bowl (not a glass — you eat this with a spoon)
- Spatula (to scrape every last bit from the blender)
Step-by-Step Instructions
- Add the frozen coffee cubes to the blender first. Put them in before anything else — they’re the hardest ingredient and need to be closest to the blades.
- Add the frozen banana slices on top of the cubes. Breaking the banana into 4-5 chunks helps the blender process everything evenly.
- Add the protein powder and 80ml of milk. Start with the smaller amount of liquid. The goal is a thick, spoonable consistency — thicker than a smoothie but not frozen solid.
- Blend on high, using the tamper if your blender has one. This will take 30-60 seconds. You’ll hear the blender struggle at first — that’s normal. Push the ingredients toward the blades with the tamper. If your blender doesn’t have a tamper, stop every 10 seconds to scrape down the sides with a spatula.
- Check the consistency. It should be thick like soft-serve ice cream. If it’s too thick to blend, add milk 1 tablespoon at a time. If it’s too thin, add 2-3 more coffee cubes and blend again.
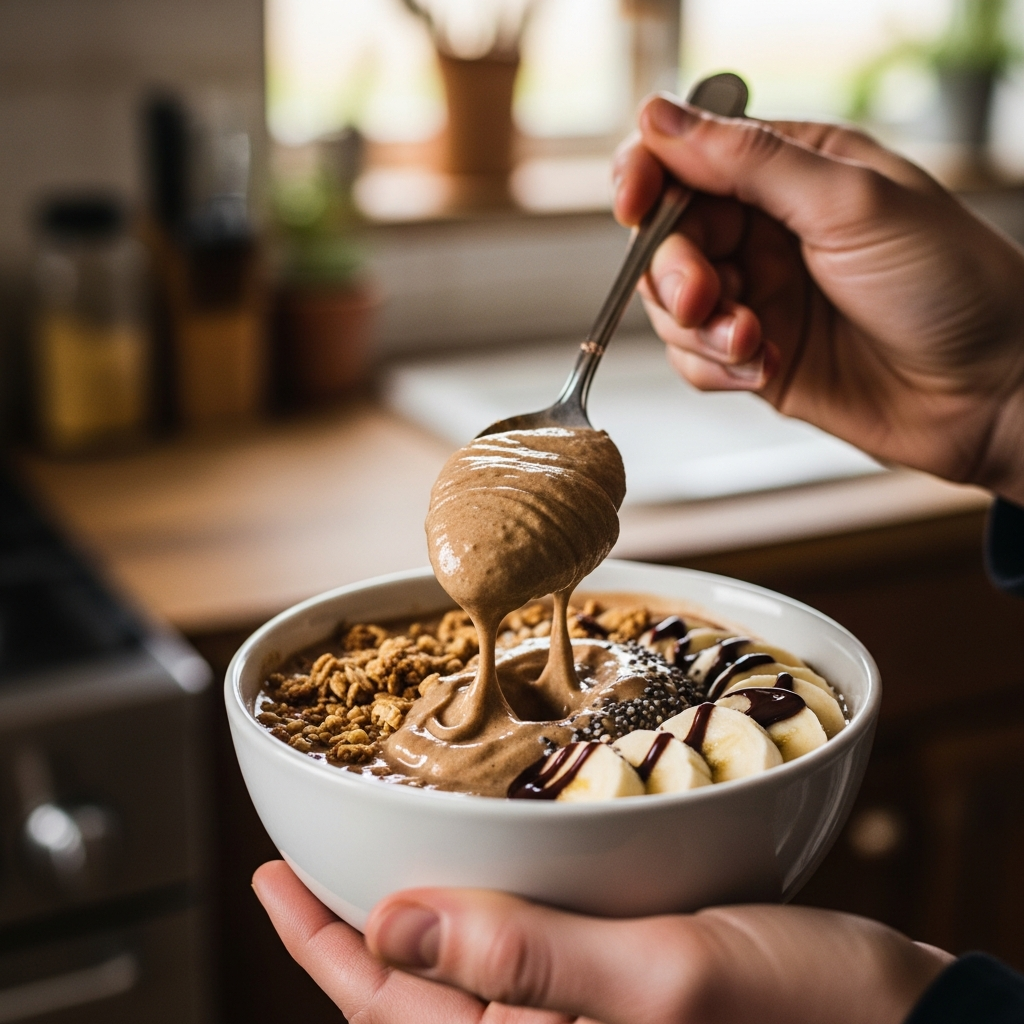
- Pour into a wide bowl and add toppings immediately. The bowl starts melting the moment it hits room temperature, so have your toppings ready to go before you even start blending.
Base Bowl Macros: 285 calories | 28g protein | 36g carbs | 3g fat (with 2% dairy milk and whey protein)
5 Topping Variations
Here’s where you make the bowl your own. I’ve tested dozens of topping combinations, and these five are the ones I keep coming back to. Each one changes the flavor profile completely while adding specific nutritional benefits.
1. “The Mocha” (Chocolate Lover’s Dream)
This is the most popular variation among people I’ve made it for. The cacao nibs add crunch and bitterness that makes it taste like an expensive dark chocolate dessert rather than a health food bowl.
Toppings
- 2 tablespoons cacao nibs
- 15g dark chocolate chips (70% cocoa or higher)
- 1 tablespoon unsweetened coconut flakes, toasted
- Drizzle of honey (about 1 teaspoon)
Total Bowl Macros (base + toppings): 430 calories | 30g protein | 46g carbs | 14g fat
Why it works: The cacao nibs are the star — they provide an intense chocolate crunch without the sugar of regular chocolate. Combined with the coffee base, it’s basically a mocha in bowl form. Toast the coconut flakes in a dry pan for 2 minutes — it makes a huge difference in flavor.
2. “The Nutty Professor” (Crunchy and Filling)
If you need this bowl to keep you full through a long morning, this is the variation. The combination of almond butter, granola, and sliced almonds adds healthy fats and fiber that extend satiety by a good 1-2 hours compared to the base bowl alone.
Toppings
- 1 tablespoon almond butter, drizzled (warm it for 10 seconds in the microwave so it drizzles easily)
- 3 tablespoons low-sugar granola
- 1 tablespoon sliced almonds
- Pinch of flaky sea salt
Total Bowl Macros (base + toppings): 480 calories | 34g protein | 48g carbs | 16g fat
Why it works: The warm almond butter melting slightly into the cold smoothie base creates an incredible temperature contrast. The granola adds crunch that holds up for a good 5-10 minutes before getting soggy. The sea salt on top ties everything together — don’t skip it.
3. “The Tropical” (Surprisingly Good with Coffee)
I was skeptical about tropical fruit with coffee, but the combination of mango’s sweetness and coffee’s bitterness is outstanding. This is my go-to summer variation.
Toppings
- 50g fresh or thawed frozen mango, diced
- 1 tablespoon toasted coconut flakes
- 1 tablespoon crushed macadamia nuts
- Squeeze of lime juice
Total Bowl Macros (base + toppings): 410 calories | 30g protein | 48g carbs | 12g fat
Why it works: The lime juice is critical. It bridges the coffee and mango flavors together and prevents the bowl from tasting like two separate things mashed together. Macadamia nuts add a buttery richness that complements the tropical vibe perfectly.
4. “The PB&J” (Nostalgic Comfort)
This tastes like a PB&J sandwich met a coffee milkshake and they decided to have a baby. It’s comfort food that also happens to pack serious protein. My kids love this one too — it’s a great way to sneak protein into their breakfast.
Toppings
- 1 tablespoon natural peanut butter
- 40g mixed berries (strawberries, blueberries, raspberries — fresh or thawed frozen)
- 2 tablespoons rolled oats (raw — they add a nice chewy texture)
- Drizzle of strawberry jam (1 teaspoon, optional)
Total Bowl Macros (base + toppings): 460 calories | 35g protein | 50g carbs | 13g fat
Why it works: The peanut butter and berries are a proven combination, and they pair with coffee better than you’d expect. Use the jam sparingly — a small drizzle adds nostalgia without making the bowl too sweet. The raw oats soften slightly as they sit in the cold base, creating a texture similar to overnight oats.
5. “The Green Machine” (Nutrient Powerhouse)
This is for the days when you want to feel virtuously healthy while also getting your caffeine fix. The matcha adds an extra layer of calm energy (thanks to L-theanine) that smooths out the coffee’s caffeine curve.
Toppings
- ½ teaspoon matcha powder, dusted on top
- 1 tablespoon hemp seeds
- 2-3 slices of fresh kiwi
- 1 teaspoon honey
Total Bowl Macros (base + toppings): 380 calories | 33g protein | 42g carbs | 9g fat
Why it works: The matcha and coffee combination provides a sustained energy release — you get the immediate kick from coffee and the longer, smoother energy from matcha. Hemp seeds are a nutritional powerhouse (10g protein per 3 tablespoons) and they add a subtle nutty flavor. The kiwi provides vitamin C and a tart contrast that keeps every bite interesting.
Tips for the Perfect Coffee Smoothie Bowl
After making hundreds of these bowls, here’s what I’ve learned the hard way:
Thickness Is Everything
A smoothie bowl that’s too thin is just a smoothie in the wrong container. The consistency you’re aiming for is soft-serve ice cream — thick enough that your spoon leaves a trail when you drag it through. The two biggest mistakes people make are adding too much liquid upfront and using regular ice cubes instead of frozen coffee cubes. Regular ice adds water volume without flavor, thinning everything out.
Frozen Banana Quality Matters
Use ripe bananas — the ones with brown spots on the skin. They’re sweeter naturally, which means you need less added sweetener. Peel them before freezing (trying to peel a frozen banana is an exercise in frustration). Slice them into coins and freeze them on a parchment-lined tray first, then transfer to a bag. This prevents them from freezing into one solid banana brick.
Work Fast Once Blended
You have about a 10-minute window from the time the bowl leaves the blender to when it becomes a puddle. Have your toppings pre-measured and ready to go. I actually line up my toppings on the counter before I even start blending. Take your photo quickly if you’re posting it — nobody wants to see a melted smoothie bowl.
The Banana-Free Option
If you don’t like bananas or you’re watching carbs, you can substitute frozen cauliflower rice. I know that sounds terrible, but frozen cauliflower blends completely smooth, has virtually no flavor, and creates the same thick consistency. Use about 120g of frozen cauliflower rice in place of the banana. You’ll need to add a sweetener (1-2 teaspoons of honey or maple syrup) since you’re losing the banana’s natural sweetness. For more banana-free ideas, my complete guide to coffee smoothies without banana covers this in depth.
Frequently Asked Questions
Can I use instant coffee instead of frozen coffee cubes?
You can, but the result isn’t as good. Dissolve 2 teaspoons of instant coffee into 2 tablespoons of hot water, let it cool, and add it to the blender with extra regular ice cubes. The bowl will be less intensely coffee-flavored and slightly more watery. The frozen cube method is worth the overnight wait.
What’s the best protein powder for smoothie bowls?
Whey protein isolate gives the smoothest texture. Plant-based blends (pea + rice) work well too, especially if you choose a vanilla or chocolate flavor that complements coffee. Avoid casein in the blender — it makes the bowl too thick, almost like cement. Save casein for pudding-style recipes.
How many coffee cubes equal one cup of coffee (caffeine-wise)?
If you made your cubes from standard-strength brewed coffee, about 8-10 cubes equals one cup of coffee’s worth of caffeine (80-100mg). If you used double-strength coffee as I recommend, 5-6 cubes will give you the same caffeine hit. Either way, you’re getting a solid dose — enough to feel alert but not jittery.
Can I meal prep smoothie bowls?
Not really. The texture degrades quickly — even in the freezer, it goes from smooth to icy within a few hours. What you CAN meal prep is everything else: freeze your coffee cubes, pre-slice and freeze bananas, portion out protein powder into small containers, and pre-measure your toppings. With that done, the actual blending takes under 3 minutes.
Is this actually healthier than my morning latte?
A typical large iced vanilla latte from a coffee shop has about 250-350 calories, 35-50g of sugar, and 6-10g of protein. The base smoothie bowl has 285 calories, under 20g of naturally occurring sugar (from the banana), and 28g of protein. So yes — significantly more protein, less sugar, more fiber, and roughly the same calories. Plus you’re actually full afterward, which a latte never accomplishes.
Final Thoughts
I’ve been making some version of this coffee smoothie bowl almost every morning for the last three months. It replaced not just my morning latte, but also the toast or cereal I used to eat alongside it. One bowl handles caffeine, protein, and breakfast in under five minutes.
Start with the base recipe and “The Nutty Professor” topping — it’s the most universally liked combination and it’s the most filling. Once you’re comfortable with the base, rotate through the other toppings to keep things fresh. And make those frozen coffee cubes in bulk every Sunday — that single prep step is the difference between making this every morning and making it never.