I’ve cleaned every type of coffee maker you can think of — from a basic Mr. Coffee drip brewer to a $2,000 espresso machine. And here’s what I’ve learned after years of doing this: every machine has its own cleaning quirks, and getting them wrong means mineral buildup, stale flavors, and a shorter lifespan for equipment you paid good money for.
This guide covers eight different coffee maker types, each with specific cleaning steps, supply lists, and the mistakes I see people make over and over. Bookmark this page — you’ll come back to it every time your coffee starts tasting off.
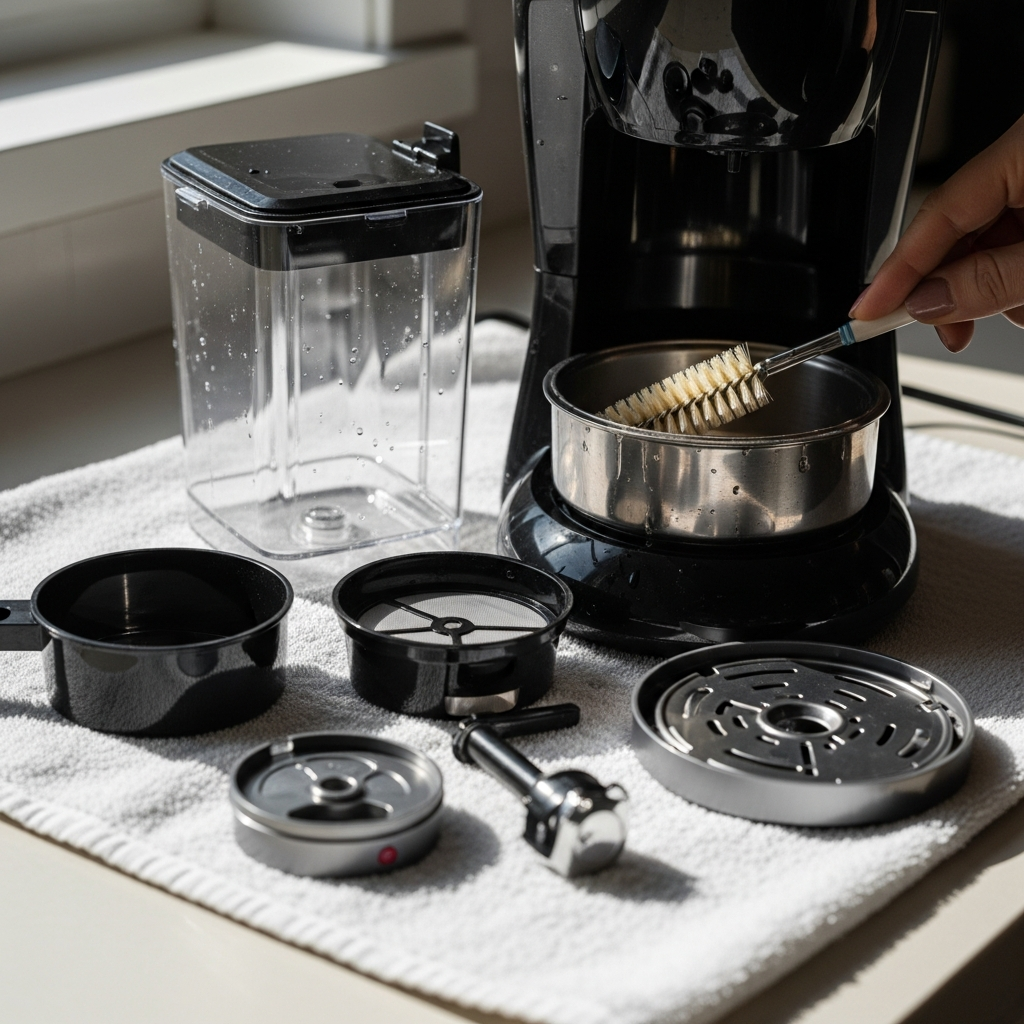
Drip Coffee Maker
What You’ll Need
- White distilled vinegar
- Fresh water
- Dish soap
- Soft cloth or sponge
- Paper towels
- Optional: citric acid powder as a vinegar alternative
The Cleaning Process
Start by emptying the carafe and removing the filter basket. Wash both with warm soapy water — get into the corners of the basket where old grounds collect. Now fill the water reservoir with a 50/50 mix of white vinegar and water. Run a full brew cycle with no filter and no coffee. The vinegar solution dissolves mineral deposits inside the water lines and heating element.
Once that cycle finishes, dump the vinegar solution from the carafe. Fill the reservoir with plain water and run another full cycle. Do this twice — two full rinse cycles — to flush out all vinegar residue. I cannot stress this enough: one rinse cycle is not enough. Your next pot will taste like vinegar if you skip the second rinse.
Wipe down the exterior, the warming plate (when cool), and the area around the brew basket where splashes accumulate. For a deeper dive into maintaining your drip machine, check out my guide on how to clean your coffee maker without vinegar.
How Often
Run the vinegar descale cycle once a month if you use your machine daily. If your water is hard (you’ll know because you see white crusty buildup around faucets), do it every two weeks. Wash the carafe and filter basket after every single use — don’t just rinse and reuse.
Common Mistakes
- Using apple cider vinegar instead of white — it leaves residue and odor
- Running only one rinse cycle after descaling
- Never cleaning the warming plate, which burns on coffee drips and creates a stale smell
- Ignoring the spray head/shower plate above the filter basket where mineral deposits collect
Keurig and Pod Machines
What You’ll Need
- White distilled vinegar or Keurig descaling solution
- Fresh water
- A paperclip or Keurig needle cleaning tool
- Dish soap
- A dry microfiber cloth
The Cleaning Process
Remove the water reservoir and wash it with warm soapy water. Pull out the drip tray and wash that too — mold grows underneath it faster than you’d expect. Now take a paperclip and straighten one end. Open the K-Cup holder and carefully poke the paperclip into the exit needle on the bottom and the entrance needle on the top. Old coffee grounds pack into these needles and restrict water flow, which is the number one reason your Keurig makes weak coffee.
For descaling, fill the reservoir with 50/50 vinegar and water (or use the Keurig descaling solution). Run brew cycles with no pod inserted until the reservoir is empty. Then fill with plain water and run cycles until that’s empty too. This is the same two-pass approach as drip machines — descale, then flush.
I have a full walkthrough in my Keurig cleaning guide if you want the detailed version with photos.
How Often
Descale every 3 months, or when the descale light comes on. Clean the needles monthly. Wash the water reservoir weekly. Wipe the drip tray every few days — it’s a breeding ground for bacteria.
Common Mistakes
- Ignoring the exit needle — most people don’t even know it exists
- Leaving water sitting in the reservoir for days (bacteria and algae grow)
- Never removing and washing the K-Cup holder assembly
- Using the machine with the descale light on, which overworks the pump
Nespresso Machines
What You’ll Need
- Nespresso descaling kit (two packets per cycle) or citric acid solution
- Fresh water
- A container that holds at least 1 liter
- Damp cloth
The Cleaning Process
Nespresso machines have a specific descaling mode that varies by model. On Original line machines like the CitiZ or Pixie, you typically hold both buttons for 3 seconds to enter descaling mode. On Vertuo machines, the process involves holding the button and lever simultaneously.
Empty the capsule container and drip tray. Fill the water tank with 500ml of water and add one descaling packet. Place your container under the spout. Activate descaling mode and let the full tank run through. Then fill the tank with plain water and run the rinse cycle. Repeat the rinse once more.
Between descaling sessions, run a hot water cycle (no capsule) after your last coffee of the day. This flushes milk residue and coffee oils from the spout and internal channels.
How Often
Nespresso recommends descaling every 300 capsules or every 3 months, whichever comes first. Empty the capsule container and drip tray daily if you’re a heavy user.
Common Mistakes
- Using white vinegar — Nespresso specifically warns against it because the acidity can damage internal seals
- Forgetting to empty the capsule container, which causes spent capsules to sit in standing water
- Not running the rinse cycle twice after descaling
- Skipping the daily hot water flush, allowing milk proteins to build up in the spout
French Press
What You’ll Need
- Dish soap
- A soft sponge or bottle brush
- Baking soda (for deep cleaning)
- A fine-mesh strainer (to catch grounds before they go down the drain)
The Cleaning Process
First rule: never dump French press grounds directly into the sink. They will clog your drain over time. Add a little water to the carafe, swirl, and pour through a fine-mesh strainer over the sink. Compost the grounds or toss them in the trash. For ideas on what to do with used grounds, see my post on how to dispose of coffee grounds.
Disassemble the plunger completely — unscrew the filter screens from the rod. You’ll typically find three parts: the mesh filter, the metal plate, and the cross plate. Wash each piece individually with warm soapy water. Coffee oils get trapped between the screens, and if you never take them apart, your coffee will taste rancid within a few weeks.
For deep cleaning, make a paste of baking soda and water. Spread it on the inside of the glass carafe and let it sit for 15 minutes. Scrub gently with a soft sponge — never use abrasive pads on glass. Rinse everything thoroughly and let it air dry before reassembling.
How Often
Wash after every single use. Disassemble the plunger and clean each screen individually at least once a week. Deep clean with baking soda every 2-4 weeks.
Common Mistakes
- Never disassembling the plunger — this is the most common one
- Dumping grounds into the sink drain
- Using steel wool or abrasive scrubbers on the glass carafe
- Leaving coffee sitting in the press for hours after brewing
Pour-Over and Chemex
What You’ll Need
- Dish soap
- A long bottle brush (essential for the Chemex hourglass shape)
- White vinegar or citric acid
- Ice cubes and coarse salt (for stuck-on residue)
The Cleaning Process
Pour-over drippers like the Hario V60 are simple — wash with warm soapy water after every use and dry completely. Pay attention to the spiral ridges inside the dripper where coffee oils collect.
The Chemex is trickier because of its narrow waist. You can’t get your hand inside, so you need a bottle brush. Fill the Chemex halfway with warm soapy water, scrub with the brush reaching down into the bottom chamber, then rinse thoroughly. For stubborn coffee stains, fill the Chemex with ice cubes, add 2 tablespoons of coarse salt, and swirl vigorously. The ice-salt combination acts as an abrasive without scratching the glass.
If mineral deposits have built up (white cloudy film), fill the Chemex with a 50/50 vinegar-water solution and let it sit for 4 hours. Rinse with plain water until the vinegar smell is gone.
How Often
Wash after every use. Do the deep vinegar soak monthly. Replace the wooden collar and leather tie on the Chemex when they start to deteriorate — they’re not meant to get wet repeatedly.
Common Mistakes
- Putting the Chemex in the dishwasher — the wooden collar will warp and crack
- Not using a bottle brush and just swirling water, which doesn’t remove oil buildup
- Leaving the paper filter in the dripper between uses
- Ignoring the cloudy mineral film that builds up on glass over time
Moka Pot
What You’ll Need
- Warm water (no soap — seriously)
- A soft cloth
- White vinegar (for occasional deep cleaning only)
- A replacement rubber gasket (have one on hand)
The Cleaning Process
Moka pots are the exception to every other coffee maker on this list: you should NOT use soap for regular cleaning. The aluminum body absorbs soap flavors that then leach into your coffee. After each use, wait for the pot to cool completely, disassemble all three chambers, and rinse everything under warm running water. Use your fingers or a soft cloth to wipe out the filter basket and remove spent grounds.
Check the rubber gasket and filter plate every time you clean. The gasket sits between the upper and lower chambers and creates the pressure seal. If it’s cracked, stiff, or deformed, replace it immediately — a bad gasket means weak coffee and potential safety issues with pressure buildup. For more details, see my guide on how to clean an old moka pot.
For deep cleaning (only when needed), fill the bottom chamber with a 50/50 vinegar-water solution and run a brew cycle. Then run two cycles with plain water to flush everything out. Don’t do this often — once every 3-6 months is plenty.
How Often
Rinse after every use. Deep clean with vinegar every 3-6 months. Replace the rubber gasket every 6-12 months depending on usage frequency.
Common Mistakes
- Using dish soap — the biggest and most common moka pot mistake
- Putting an aluminum moka pot in the dishwasher (it will oxidize and turn dark)
- Not checking the gasket regularly, which leads to weak brewing and leaks
- Scrubbing the inside with abrasive pads, which removes the protective patina
Percolator
What You’ll Need
- Dish soap
- Baking soda
- White vinegar
- A bottle brush
- Soft cloth
The Cleaning Process
Disassemble the percolator: remove the lid, the basket and its lid, the stem tube, and the spreader plate. Wash each piece with warm soapy water. The stem tube tends to collect mineral buildup inside — run a bottle brush through it to clear the channel.
For the main pot body, fill it with water and add 3 tablespoons of baking soda. Let it perk through a full cycle (or bring to a boil on the stove for stovetop models). The baking soda dissolves coffee oils and light mineral deposits. Dump, rinse, and repeat with plain water.
For heavy mineral buildup, fill the pot with 50/50 vinegar-water and run a full cycle. Follow with two plain water cycles. If the pot is stainless steel, you can also use a paste of baking soda and water to scrub the interior.
How Often
Wash all removable parts after every use. Run the baking soda cleaning cycle weekly if you use your percolator daily. Do the vinegar descale monthly.
Common Mistakes
- Forgetting to clean the inside of the stem tube
- Not washing the spreader plate, which distributes water over the grounds
- Letting coffee sit in the pot on the burner for hours, baking residue onto the bottom
- Using harsh chemical cleaners instead of baking soda or vinegar
Espresso Machine
What You’ll Need
- Espresso machine cleaning tablets (like Cafiza)
- A blind/backflush basket
- A group head brush
- Descaling solution (citric acid-based)
- A soft cloth and small brush for the steam wand
- A pin or needle for the steam tip holes
The Cleaning Process
Espresso machines require the most rigorous cleaning routine of any coffee maker. After every shot, remove the portafilter, knock out the puck, rinse the basket, and run water through the group head for 2-3 seconds. This flushes loose grounds from the shower screen.
The steam wand needs attention after every use too. Purge the wand by opening the steam valve for 2 seconds to blow out any milk inside the tip. Then wipe the wand with a damp cloth immediately — if milk dries on the wand, it becomes cemented on and extremely hard to remove. If the steam tip holes get clogged, use a pin to clear each one individually.
For weekly backflushing (machines with three-way solenoid valves only — don’t backflush machines without this valve), insert the blind basket into the portafilter, add a cleaning tablet, lock into the group head, and run the pump for 10 seconds. Stop for 10 seconds. Repeat 5 times. Remove the portafilter and run water through the group head. Reinsert the portafilter (without the tablet) and repeat the cycle with just water. For more on keeping your milk components clean, check out my post on how to clean a milk frother.
Descale every 2-3 months following your machine’s specific instructions — this varies significantly between brands. Always use a descaling solution that’s compatible with your machine. Some manufacturers void the warranty if you use vinegar.
How Often
After every shot: rinse portafilter, flush group head, wipe steam wand. Weekly: backflush with cleaning tablets. Monthly: soak portafilter and baskets in cleaning solution. Every 2-3 months: full descale. Yearly: have a technician service the machine (replace gaskets, check pump pressure).
Common Mistakes
- Not wiping the steam wand immediately after use — dried milk is the #1 espresso machine problem
- Backflushing a machine that doesn’t have a three-way solenoid valve (this can damage the pump)
- Using vinegar to descale when the manufacturer warns against it
- Never cleaning the shower screen, which clogs and causes uneven extraction
- Forgetting to clean the drip tray — it’s a petri dish
Quick Reference: Cleaning Frequency by Machine Type
Here’s a summary so you can see everything at a glance:
- Drip coffee maker: Rinse carafe daily, vinegar descale monthly
- Keurig/pod machine: Clean needles monthly, descale every 3 months
- Nespresso: Descale every 300 capsules or 3 months
- French press: Wash after every use, disassemble plunger weekly
- Pour-over/Chemex: Wash after every use, vinegar soak monthly
- Moka pot: Rinse (no soap) after every use, vinegar deep clean every 3-6 months
- Percolator: Wash parts after every use, baking soda cycle weekly, vinegar monthly
- Espresso machine: Rinse after every shot, backflush weekly, descale every 2-3 months
Frequently Asked Questions
Can I use apple cider vinegar instead of white vinegar to clean my coffee maker?
I don’t recommend it. Apple cider vinegar contains sugars and organic compounds that leave residue behind. White distilled vinegar is a pure acetic acid solution that rinses clean. If you want an alternative to white vinegar, use citric acid powder dissolved in water — it’s actually more effective at dissolving mineral deposits.
How do I know if my coffee maker needs descaling?
Three signs: your machine takes noticeably longer to brew a full pot, the coffee temperature is lower than usual (mineral buildup insulates the heating element), or you see white crusty deposits around the water outlet or shower head. Some machines have a descale indicator light — don’t ignore it when it comes on.
Is it safe to put coffee maker parts in the dishwasher?
Glass carafes and plastic filter baskets from drip machines are generally dishwasher safe — check the manual. Never put aluminum moka pots, Chemex carafes (wooden collar), or espresso machine portafilters in the dishwasher. When in doubt, hand wash — it takes 30 seconds and won’t damage anything.
Why does my coffee taste bitter even with fresh beans?
A dirty machine is the most overlooked cause of bitter coffee. Rancid coffee oils build up on every surface that contacts brewed coffee — the carafe, filter basket, shower screen, and internal tubes. These old oils mix with your fresh brew and add harsh, bitter flavors. If your coffee has been tasting off lately, a thorough deep clean is the first thing to try before you blame the beans.
What’s the best all-purpose cleaner for coffee equipment?
For descaling (mineral removal), white vinegar or citric acid. For coffee oil removal, baking soda paste or dedicated coffee equipment cleaner like Cafiza. Don’t use bleach — it can damage rubber seals and is difficult to rinse completely. Don’t use scented cleaners — the fragrances can transfer to your coffee.