I ruined my first burr grinder by washing the burrs with water. Within a week, I noticed rust spots on the steel, and my coffee started tasting metallic. That $150 grinder was toast — and it was entirely my fault. I’ve since learned exactly how to clean a burr grinder properly, and the cardinal rule is simple: keep water away from the burrs unless your manufacturer explicitly says otherwise.
This guide covers three cleaning methods ranked by cost and effectiveness, plus step-by-step disassembly instructions for the most popular grinder models. If you’re choosing between a burr grinder and a blade grinder, know that burr grinders require more careful maintenance — but the coffee quality payoff is worth it.
Why Burr Grinders Need Regular Cleaning
Coffee beans contain oils — roughly 15% of the bean by weight for a medium roast, and even more for dark roasts. Every time you grind, a thin film of these oils coats the burrs, the grinding chamber, and the grounds chute. Old coffee oils go rancid within a few weeks, and rancid oils produce stale, bitter flavors that contaminate every cup you brew.
Beyond flavor, oil buildup causes practical problems. Grounds start clumping and sticking to the chute instead of falling cleanly into the container. The adjustment mechanism gets gummy and stiff. And in extreme cases, packed grounds can actually seize the burrs, burning out the motor on electric grinders.
If you grind oily beans, this happens even faster. Dark roasts and flavored beans are the worst offenders — their oils coat everything more heavily and go rancid sooner.
The Critical Rule: Never Use Water on Metal Burrs
This deserves its own section because it’s the most common mistake I see. Steel burrs rust when exposed to water. Even a quick rinse followed by towel drying leaves moisture trapped in the threading, between the burr plates, and in the adjustment mechanism. That moisture causes rust, and rust does two things: it contaminates your coffee with a metallic taste, and it pits the burr surface, ruining the precision edges that create an even grind.
Ceramic burrs are more water-resistant but still shouldn’t be submerged — the ceramic itself won’t rust, but the metal components around it (the shaft, mounting hardware, adjustment ring) absolutely will. For a deeper look at the differences, see my comparison of ceramic vs. steel grinder burrs.
The only parts of your grinder that should contact water are the removable hopper (the bean container on top) and the grounds container. Everything else stays dry.
What Rust Damage Looks Like
If you suspect your burrs have moisture damage, remove them and inspect closely. Early rust appears as small orange-brown dots on the burr surface, typically starting in the crevices between the cutting teeth where water pools. Advanced rust shows larger discolored patches, rough texture on what should be smooth steel, and pitting — small craters where the metal has corroded away.
Once burrs are pitted, they can’t be restored. The precision-ground cutting edges are permanently damaged, and your grind consistency will suffer no matter how you adjust the settings. At that point, you either replace the burrs (if your model sells them separately) or replace the entire grinder. Prevention is significantly cheaper.
What You’ll Need
- A stiff-bristled grinder brush (most grinders include one; replacements cost $5-8)
- Grindz cleaning tablets (optional but recommended for monthly deep cleaning)
- A can of compressed air (optional but helpful)
- A soft dry cloth
- A Phillips head screwdriver (for disassembly on some models)
- Wooden toothpicks (for packed grounds in tight spots)
Method 1: Dry Brush Cleaning (Weekly)
This is your baseline maintenance and costs nothing beyond the brush that came with your grinder. Do this every week if you grind daily, or after every 5-7 uses.
Step-by-Step Process
- Unplug the grinder (for electric models) and remove the hopper. Empty any remaining beans.
- Set the grinder to the coarsest setting. This opens the gap between the burrs as wide as possible, giving you better access.
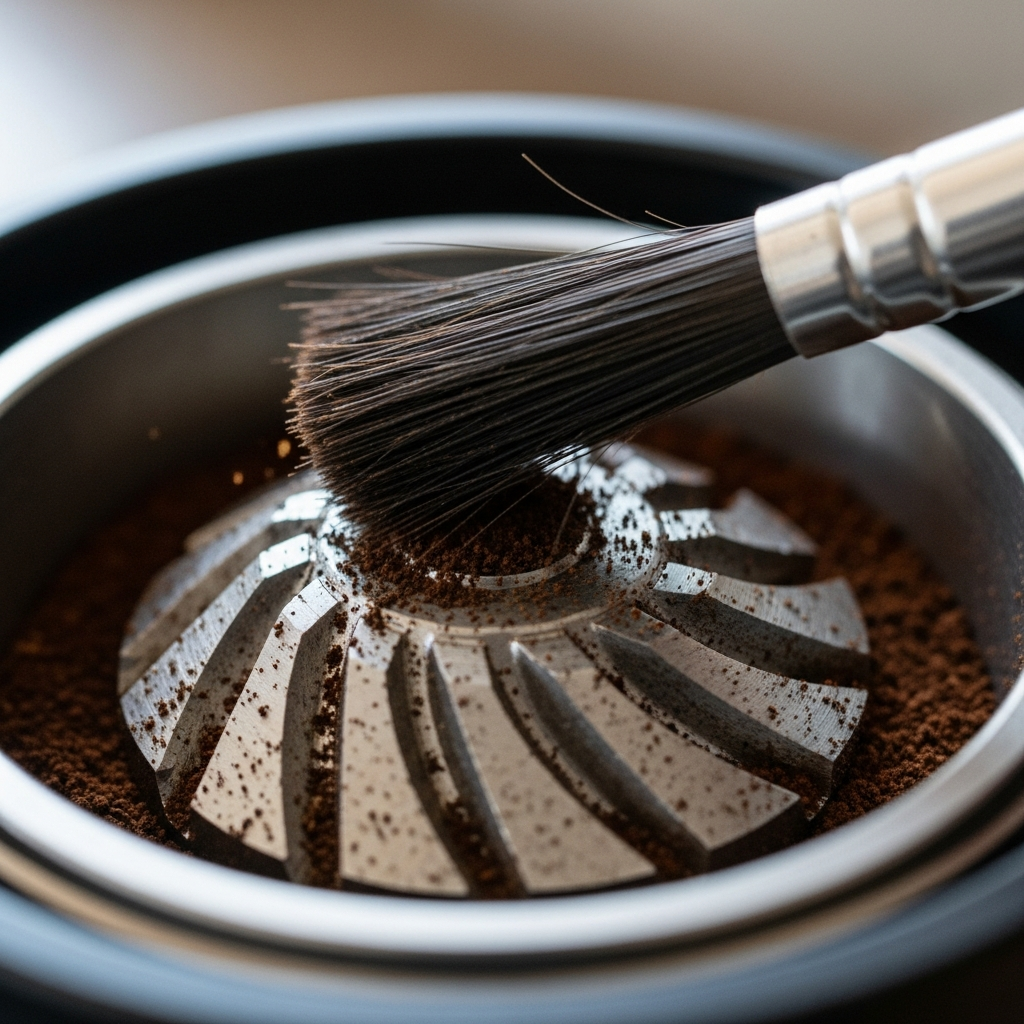
- Use the stiff brush to sweep out retained grounds from around the upper burr, the grinding chamber walls, and the grounds chute. Work the bristles into the teeth of the burrs to dislodge trapped grounds.
- Tap the grinder gently upside down over a trash can to shake out loose particles.
- Use a wooden toothpick to clear any packed grounds in the chute or exit channel.
- If you have compressed air, give a few short bursts into the grinding chamber and chute. Keep the can upright to avoid spraying propellant.
- Wipe the hopper with a dry cloth (or wash it with soap and water, dry completely before reattaching).
- Return the grind setting to your preferred position.
This takes about 3-4 minutes and prevents most oil buildup from becoming a problem. The key is consistency — a quick weekly brush prevents the need for more aggressive cleaning methods.
Method 2: Grindz Cleaning Tablets (Monthly)
Grindz tablets are made from food-safe grain compounds that absorb coffee oils as they pass through the burrs. Think of them as a dry shampoo for your grinder. A jar costs about $10 and lasts 12-15 cleanings — easily the best value for thorough burr cleaning.
Step-by-Step Process
- Empty the hopper completely. Remove every coffee bean — you don’t want to mix Grindz with actual coffee.
- Pour one capful (about 35-40 grams) of Grindz tablets into the hopper.
- Set the grinder to a medium setting.
- Run the grinder until all the tablets have passed through. You’ll see tan-colored powder come out — that’s the Grindz absorbing and carrying away the old coffee oils.
- Now add a small amount of fresh, inexpensive coffee beans (about 20 grams). Grind those through to purge any remaining Grindz residue from the burrs and chute.
- Discard the purge grounds. Your grinder is now clean and ready for your good beans.
Grindz is the method I use monthly on my own grinder. It reaches areas that brushing can’t — the inner surfaces of the burrs, the space between the burr carrier and the grinding chamber, and deep inside the adjustment mechanism where oils accumulate silently.
Method 3: The Rice Method (Controversial — Read This First)
You’ll find plenty of advice online telling you to grind dry rice through your burr grinder to clean it. The theory is that rice absorbs oils just like Grindz tablets. And on the surface, it works — rice does absorb some oil, and the grounds chute does come out looking cleaner after running rice through.
But here’s the problem: rice is significantly harder than coffee beans. On the Mohs hardness scale, dry rice scores around 6-7, while roasted coffee beans are around 3. Your steel burrs are designed to crush coffee, not rice. Running rice through a burr grinder subjects the cutting edges to forces they weren’t designed for, and it can accelerate wear on the burrs, especially on lower-end models with softer steel.
Several major manufacturers explicitly warn against it. Baratza’s official position is that rice can damage their burrs and void the warranty. Breville has similar guidance. The only scenario where rice might be acceptable is in large commercial grinders with hardened steel burrs designed for heavy-duty use — and even then, Grindz is a better option.
My recommendation: skip the rice. Grindz tablets cost $10 and are specifically formulated for this job. There’s no reason to risk your burrs to save a few dollars.
Disassembly Guide: Baratza Encore
The Baratza Encore is one of the most popular home burr grinders, and Baratza designed it to be easy to take apart for cleaning. Here’s how to access the burrs for a thorough cleaning:
- Unplug the grinder and remove the hopper by twisting it counterclockwise and lifting straight up.
- You’ll see the upper burr sitting in a plastic carrier. Grab the carrier tabs on both sides and pull straight up. The upper burr lifts right out — no tools needed.
- Use your brush to clean the upper burr thoroughly, working between each cutting tooth.
- Look down into the grinding chamber. You’ll see the lower burr (the one attached to the motor shaft). Brush this thoroughly too, clearing all trapped grounds from between the teeth and around the edges.
- Use compressed air or a toothpick to clear the grounds chute visible at the bottom of the chamber.
- Wipe the upper burr carrier with a dry cloth. Check that the burr is seated firmly in the carrier.
- Drop the upper burr carrier back into position — it only fits one way, aligned with the guide tabs.
- Reattach the hopper by placing it on top and twisting clockwise until it clicks.
Baratza also sells replacement burrs for around $30 — if your burrs are showing signs of wear after years of use, swapping them is straightforward and much cheaper than buying a new grinder. That’s one reason why the Encore remains a top pick in our roundup of the best coffee grinders for home.
Disassembly Guide: Breville Smart Grinder Pro
The Breville Smart Grinder Pro requires a slightly different approach because the upper burr is removed differently:
- Unplug the grinder. Remove the hopper by turning it to the unlock position and lifting up.
- The upper burr assembly is held in by a locking ring. Twist the ring counterclockwise (there are tabs to grip) and the upper burr pops free.
- Clean the upper burr with a dry brush, paying attention to the conical shape — grounds get packed into the inner cone area.
- Brush out the lower burr inside the chamber. The Breville has a narrower chute than the Encore, so use compressed air here if you have it.
- Clean the grind adjustment area around the upper burr housing — oils collect on the threading.
- Reassemble by seating the upper burr and twisting the locking ring clockwise until it clicks.
Disassembly Guide: Manual Hand Grinders
Manual grinders (like the Timemore C2, 1Zpresso, or Hario Skerton) are the easiest to disassemble because they’re designed with fewer parts. If you’re considering one, check out the comparison of electric vs. manual grinders.
- Remove the handle, the adjustment dial (usually on top), and the top cap.
- Pull the inner burr straight out from the top. It slides off the central shaft.
- The outer burr is fixed inside the body. Brush it in place — don’t try to remove it.
- Brush the inner burr thoroughly. On manual grinders, the burrs are often ceramic, which is easier to keep clean but still shouldn’t be submerged in water.
- Clean the body by tapping it upside down and brushing the inside.
- Reassemble in reverse order. Make sure the adjustment dial clicks back to your previous setting — the grind size resets when you remove the inner burr on most models.
Cleaning Schedule: How Often for Each Method
- Dry brush cleaning: Weekly (or after every 5-7 grinding sessions)
- Grindz tablets: Monthly (or every 30-40 uses)
- Full disassembly and deep clean: Every 2-3 months
- Burr replacement: Every 2-3 years for home use (or when you notice inconsistent grind size despite calibration)
If you grind dark roast or flavored beans, double the frequency of each cleaning method. The extra oils from these beans accelerate buildup significantly.
Frequently Asked Questions
Can I wash burrs with water if I dry them immediately?
No. Even immediate towel drying leaves moisture in the microscopic grooves and threading of steel burrs. This moisture causes rust over days, not hours. The only exception is if your manufacturer specifically states the burrs are water-safe — some high-end commercial grinders have stainless steel burrs rated for water cleaning. Check your manual.
My grinder smells stale but I clean it regularly. What am I missing?
You’re probably missing the grounds chute and the area around the adjustment mechanism. These are the two spots that brushing alone can’t fully reach. Run Grindz tablets through, and also check if there’s a removable upper burr carrier with trapped grounds behind it. Some models accumulate grounds in hidden cavities that you only discover during full disassembly.
How do I know when to replace the burrs instead of just cleaning them?
Two signs: first, your grind consistency drops noticeably even after cleaning and recalibrating — you see a mix of fine powder and large chunks instead of uniform particles. Second, the burr teeth look rounded or dull when you inspect them closely. Sharp burrs have defined edges; worn burrs look smooth and rounded. Most home burr grinders need new burrs every 2-3 years with daily use.
Is there a grinder that’s easier to clean than others?
Baratza grinders are the gold standard for easy cleaning because they’re designed with tool-free disassembly. The upper burr pops out without any screws or locks. Manual grinders are also very easy to fully disassemble. The hardest to clean are built-in grinders on super-automatic espresso machines, where access to the burrs is limited by design.
Can I use instant rice instead of regular rice for the rice method?
Instant rice is softer than regular rice, which reduces the risk of burr damage, but I still recommend against it. Grindz tablets exist specifically for this purpose, cost almost nothing per use, and carry zero risk of damaging your equipment. There’s no good reason to experiment with rice when a proven, purpose-built product is available.