My parents’ drip coffee maker lasted 14 years. Not because it was anything special — it was a basic Cuisinart — but because my mom maintained it like clockwork. Monthly vinegar runs, weekly part washing, filter replacements on schedule. Meanwhile, I burned through two coffee makers in three years before I figured out that the problem wasn’t the machines. It was me.
The average drip coffee maker lasts 5-7 years. With proper maintenance, you can push that to 10 years or beyond. This guide gives you a month-by-month maintenance calendar covering everything from daily rinses to yearly deep cleans, plus a comparison of the two best descaling methods, and the telltale signs that it’s finally time to let your machine go.
What You’ll Need for Year-Round Maintenance
- White distilled vinegar (buy the gallon jug — you’ll go through it)
- Citric acid powder (optional alternative to vinegar)
- Dish soap
- Soft sponge and a bottle brush
- Dry microfiber cloth
- Replacement charcoal water filter (check your model — most use them)
- Paper towels
- A toothbrush (dedicated for cleaning, not your actual toothbrush)
- Toothpick or thin skewer
Daily Maintenance: 2 Minutes
After brewing your last pot of the day, do these three things before walking away:
- Empty and rinse the carafe immediately. Don’t let coffee sit on the warming plate or dry in the pot. Fill the carafe with hot water, swirl, and dump. This prevents the burnt residue that builds up on glass and becomes nearly impossible to remove later. If you’ve already got burnt staining, see my guide on how to clean a burnt coffee pot.
- Remove and dump the used filter and grounds. Toss the paper filter or empty your reusable filter into the compost or trash. Don’t leave wet grounds sitting in the basket — they breed mold and bacteria within 24 hours.
- Leave the lid open. After rinsing the carafe and basket, leave the brew basket area open to air dry. A closed, damp environment is where mold starts growing inside your machine.
Total time: about 2 minutes. This single habit prevents the majority of coffee maker problems.
Weekly Maintenance: 10 Minutes
Pick one day each week (I do it Sunday evening) and do a more thorough cleaning:
- Wash the carafe with dish soap and warm water. Use a sponge to scrub the inside, paying attention to the bottom where coffee residue settles. Rinse thoroughly — soap residue will make your next pot taste terrible.
- Remove and wash the filter basket. Most filter baskets lift or swing out. Wash it with soapy water, scrubbing the mesh if it’s a reusable basket, or the plastic housing if you use paper filters. Dry completely.
- Wipe the exterior. Use a damp cloth to wipe down the housing, buttons, and the area around the brew basket where coffee splashes accumulate. Dry with a microfiber cloth.
- Clean the warming plate (when completely cool). Dampen a cloth, sprinkle a small amount of baking soda on it, and gently scrub the warming plate surface. This removes the baked-on coffee drips that cause a burning smell. Wipe clean with a damp cloth and dry.
For machines that have a reusable metal filter, also wash that with dish soap and use a toothbrush to scrub the fine mesh. A dedicated coffee brush makes this even easier if you have one.
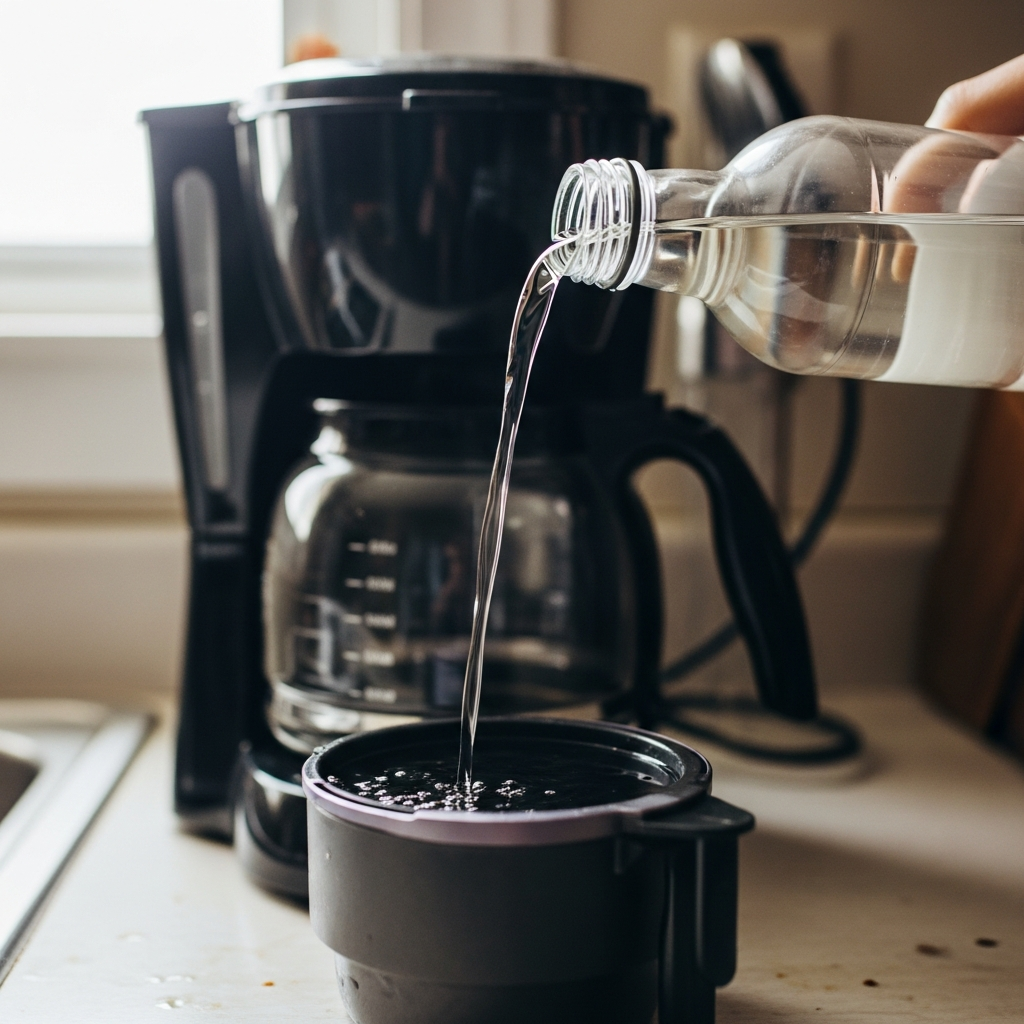
Monthly Maintenance: The Full Vinegar Descale Cycle
Descaling is the single most important maintenance task for extending your coffee maker’s life. Mineral deposits from your tap water (calcium and magnesium, primarily) accumulate inside the water lines, heating element, and internal reservoir. This buildup restricts water flow, reduces brewing temperature, slows brew time, and eventually clogs components completely.
The Process
- Make the vinegar solution. Fill the water reservoir to the max line with a 50/50 mix of white vinegar and water. Use room-temperature water.
- Run a half cycle. Start a brew cycle with no filter and no coffee. When the carafe is about half full, turn the machine off and let the vinegar solution sit inside the water lines and heating chamber for 30 minutes. This soaking time is what actually dissolves the mineral deposits — just running the vinegar through isn’t enough.
- Complete the cycle. Turn the machine back on and let the rest of the vinegar solution brew through into the carafe.
- Dump the carafe. Look at the vinegar in the carafe — if you see white flakes or particles floating in it, those are mineral deposits that came loose. That’s the vinegar doing its job.
- Run the first rinse cycle. Fill the reservoir with plain water all the way to the max line. Run a complete brew cycle.
- Run the second rinse cycle. Fill with plain water again and run another complete cycle. Two rinse cycles are mandatory — one rinse will still leave vinegar flavor in your next pot of coffee. If you’re sensitive to the vinegar taste, run a third rinse to be safe.
If your water is hard (you’ll know because you see white crusty buildup around faucets and shower heads), increase this to every 2 weeks instead of monthly. Hard water areas include most of the Southwest, Florida, Texas, and the upper Midwest. For cleaning approaches that skip the vinegar entirely, check out my guide on how to clean a coffee maker without vinegar.
Vinegar vs. Citric Acid: Which Is Better for Descaling?
Vinegar is the traditional go-to, but citric acid is arguably the better choice. Here’s how they compare:
White vinegar (5% acetic acid) is cheap, available everywhere, and effective at dissolving calcium and magnesium deposits. The downside is the strong smell during the descale cycle and the taste residue that requires multiple rinse cycles. It also leaves a slight odor inside the machine that can take a few brew cycles to fully dissipate.
Citric acid powder (available at grocery stores in the canning section, or online) is odorless and tasteless once rinsed. It’s more effective at dissolving mineral deposits at the same concentration — citric acid has a lower pH than acetic acid, meaning it’s a stronger acid for descaling purposes. Mix 1-2 tablespoons of citric acid powder per full reservoir of water. Run the same descale process as vinegar (half-cycle, soak 30 minutes, complete, then 2 rinse cycles).
My recommendation: Use citric acid if you can find it. It works faster, rinses cleaner, and doesn’t stink up your kitchen. Use vinegar if you need to descale right now and don’t have citric acid on hand — it works fine, just requires more thorough rinsing.
Avoid commercial descaling solutions unless your manufacturer requires a specific brand. Most are just diluted citric acid at a 10x markup. You’re paying for the packaging.
Quarterly Maintenance: The Hidden Parts
Every three months, go deeper than the monthly descale and address the parts most people never think about:
Clean the Shower Head / Spray Plate
Look up inside the brew basket area. You’ll see a plate with small holes — this is the shower head (or spray plate) that distributes hot water over your coffee grounds. Over time, mineral deposits clog these holes, causing uneven water distribution and weak spots in your brew.
- If the plate is removable (many twist off or unscrew), remove it and soak in pure white vinegar for 2 hours.
- Use a toothpick to poke through each individual hole, clearing any mineral deposits.
- Scrub with an old toothbrush to remove loosened deposits.
- Rinse thoroughly and reinstall.
- If the plate isn’t removable, use a vinegar-soaked toothbrush to scrub the holes in place, then run a plain water brew cycle to flush the debris.
Inspect the Rubber Gaskets
Check every rubber seal and gasket you can see. Look around the brew basket housing, the carafe lid, and the water reservoir connection. Coffee oils and mineral deposits build up on rubber surfaces and eventually degrade the rubber, causing leaks and reducing the seal quality.
Wipe each gasket with a damp cloth dipped in baking soda paste. If any gasket is cracked, stiff, or deformed, order a replacement from the manufacturer. Running a machine with a degraded gasket leads to leaks that damage the heating element and electronics.
Yearly Maintenance: The Full Overhaul
Once a year (I do it in January), give your machine a complete overhaul:
Deep Clean the Water Reservoir
If your water reservoir is removable, take it out and wash it with warm soapy water and a bottle brush. Look for biofilm — a slimy residue that’s actually a colony of bacteria. It forms in any standing water reservoir that isn’t cleaned regularly. If you find it, scrub with baking soda paste, rinse thoroughly, and resolve to empty the reservoir when the machine isn’t in use.
For non-removable reservoirs, fill with a strong vinegar solution (75% vinegar, 25% water) and let it sit for 4 hours before running the descale cycle. This stronger concentration addresses annual buildup that monthly maintenance may have missed.
Replace the Charcoal Water Filter
Most modern drip coffee makers have a small charcoal filter in the water reservoir. This filter removes chlorine, some minerals, and impurities from tap water before it enters the heating system. These filters are typically good for 60 days or 60 uses — but almost nobody replaces them that often.
At minimum, replace the charcoal filter once a year. Better yet, replace it every 2-3 months. A saturated filter doesn’t just stop filtering — it can actually release trapped contaminants back into your water, making things worse than having no filter at all.
Check your machine’s manual for the correct replacement filter. Cuisinart, Breville, and KitchenAid each use different filter sizes. They cost $5-10 for a pack of 2-3 and are available at most stores that sell coffee makers.
Run a Triple Descale
Once a year, run three consecutive descale cycles instead of one. Fill with 50/50 vinegar-water, run the full cycle with the 30-minute soak, dump, and repeat two more times. Then run three rinse cycles with plain water. This aggressive annual descale clears deposits that monthly maintenance gradually misses in the deepest parts of the water system.
The Complete Maintenance Calendar
Here’s your at-a-glance schedule:
- Daily: Rinse carafe, dump grounds and filter, leave basket area open to dry
- Weekly: Wash carafe and basket with soap, wipe exterior, clean warming plate
- Monthly: Full vinegar or citric acid descale cycle (50/50 solution, soak 30 min, 2 rinse cycles)
- Quarterly: Clean shower head/spray plate, inspect and wipe rubber gaskets
- Yearly: Deep clean reservoir, replace charcoal water filter, run triple descale
Print this list and tape it to the inside of the cabinet where you keep your coffee supplies. Following this schedule consistently is the difference between a machine that dies at year 4 and one that’s still going strong at year 10.
5 Signs It’s Time to Replace Your Coffee Maker
Even with perfect maintenance, every machine eventually wears out. Here are the signs that cleaning and descaling can’t fix:
- Brew time has doubled and descaling doesn’t help. If your machine used to brew a pot in 6 minutes and now takes 12, and a full descale cycle doesn’t improve it, the heating element or pump is failing. The internal water channels may be permanently narrowed by deposits that descaling can’t reach.
- Water leaks from the base. A small amount of condensation is normal, but actual water pooling under the machine means a cracked reservoir, failed gasket, or corroded connection. Gaskets can be replaced, but if the reservoir or housing itself is cracked, it’s time for a new machine.
- Coffee temperature drops below 195°F consistently. Optimal brewing temperature is 195-205°F. If your coffee comes out lukewarm even after descaling, the heating element is degrading. You can verify this with an instant-read thermometer in a fresh pot.
- You smell burning plastic or electrical odors. Stop using the machine immediately. This indicates overheating components, melting wiring, or a failing thermostat. This is a fire safety issue, not a maintenance issue. Unplug the machine and replace it.
- The machine is over 10 years old and requiring frequent repairs. At some point, the cost of replacement parts and the time spent troubleshooting exceeds the cost of a new machine. A $60-80 drip coffee maker that runs for 10 years cost you $6-8 per year — that’s an incredible value. Don’t spend $30 on a replacement part for a machine that’s living on borrowed time.
The One Thing That Kills Coffee Makers Faster Than Anything
If you take only one thing from this entire guide, make it this: descale your machine regularly. Mineral buildup is the number one killer of drip coffee makers. It clogs water lines, insulates the heating element (making it work harder and hotter to compensate), and restricts flow through the shower head. Every other maintenance task is secondary to descaling.
A clean coffee maker produces better-tasting coffee and lasts years longer. The 20 minutes per month you spend on descaling will save you from buying a new machine every 3-4 years. That’s the real math behind coffee maker maintenance.
Frequently Asked Questions
Can I use bottled water instead of tap water to avoid mineral buildup?
Yes, but with a caveat. Most bottled spring water still contains minerals — less than hard tap water, but not zero. Distilled water eliminates mineral buildup entirely, but some coffee experts argue it produces flat-tasting coffee because minerals in water contribute to extraction and flavor. A good middle ground is filtered tap water (Brita, PUR, or your machine’s built-in charcoal filter). It reduces minerals enough to slow buildup significantly while keeping enough for good extraction.
Is it OK to leave water in the reservoir overnight?
For one night, it’s fine. But don’t leave water sitting for days — stagnant water develops bacteria and biofilm. If you brew every morning, filling the reservoir the night before is acceptable. If you skip days, empty the reservoir when you’re done and refill fresh when you’re ready to brew.
My machine has a “clean” button. Does that replace manual descaling?
The clean cycle on most machines is just a longer, slower brew cycle designed to work with a descaling solution. You still need to add vinegar or citric acid to the reservoir — the button just controls the timing and flow. It doesn’t replace descaling; it automates it. Follow your machine’s instructions for what solution to use with the clean cycle.
How do I descale a single-serve coffee maker like a Keurig?
The basic principle is the same — run an acidic solution through the machine — but the process differs because there’s no carafe. I cover Keurig descaling in detail here, including the needle-cleaning step that most people miss.
Will regular maintenance void my warranty?
No. In fact, NOT maintaining your machine can void the warranty. Many manufacturers require regular descaling as a warranty condition. If your machine fails and you send it in for warranty repair, mineral buildup in the water lines is visible evidence of neglect that could get your claim denied. Keep your machine clean and you’re protected on both fronts — better performance now and valid warranty coverage later.